Archive 4324RP DDS-DC 2-8Gb (Rev 1.1.19)

Specification
| Data Transfer |
Sustained |
366 Kbytes/s (1:1 base) |
| 732 Kbytes/s (2:1 typical) |
| 1464 Kbytes/s (4:1 max) |
| Nominal Capacity |
60-metre cartridge |
1.3 Gbyte (1:1 base) |
| 2.6 Gbyte (2:1 typical) |
| 5.2 Gbyte (4:1 max) |
| 90-metre cartridge |
2.0 Gbyte (1:1 base) |
| 4.0 Gbyte (2:1 typical) |
| 8.0 Gbyte (4:1 max) |
| Unrecoverable Errors |
Less than 1 in 1015 data bits |
| Recording Format |
ANSI/ECMA Digital Storage with Data
Compression (DDS-DC) |
Media (five) |
2GB DDS tape |
GH51987 |
Using the Drive
Interpreting the LED indicators
| Green |
Amber |
Drive status |
| ON |
OFF |
Cassette inserted |
| ON |
ON |
Cassette inserted: tape being read or written |
| Flashing Slowly |
ON/OFF |
Media warning |
| Flashing rapidly |
ON |
Drive could not write to tape correctly |
| ON/OFF |
Flashing rapidly |
Hardware error or high humidity |
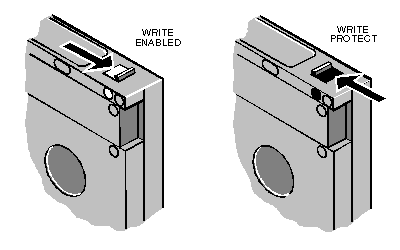
Write-protecting a cartridge
A cartridge can be write-protected by sliding the white tab on the
cartridge so that the recess is revealed. In this position, data can be read from the tape
but not written to it.
Automatic drive operation
To prolong the life of the tape and the drive mechanism, the drive
"relaxes" during periods of inactivity (no read or write operations):
After 30 seconds, the capstan and pinch roller are releasedand
tape tension is removed.
After 90 seconds, the tape is pulled away from the head cylinder, and
the cylinder stops rotating.
Inserting a cassette
Insert the cassette into the slot with the triangular arrowhead on the
cassette pointing towards the drive. As the tape is inserted, the drive takes it and
automatically loads it into the drive mechanism. A load sequence checks ambient humidity,
the tape format and data integrity. Unless the tape is blank the tape log, which contains
a history of usage of the tape, is read into the drive's memory.

The drive will automatically format a blank tape when data is first
written to it. Remember to allow time for the formatting process when you use a new tape.
Removing a cassette
Before attempting to remove a cassette, ensure that the drive is not
currently in use (the amber Drive Busy indicator must be unlit).
Press the EJECT button on the front of the drive (depending on your
operating environment, the EJECT button may be disabled while the drive is in use). If the
tape is write-enabled, a copy of the tape log, held in the drives memory, is written back
to tape. The drive rewinds to between the beginning of the tape, unthreads it, and ejects
the cassette. Several seconds may pass the button being pressed and the cassette being
ejected, so be careful not to turn off the computer before the operation is completed.
Environment
|
Operational |
Non-operational |
| Temperature |
+5ş to +45ş C |
-40ş to +65ş C |
| Humidity |
20% to 80% |
0% to 90% |
| Shock |
8G's peak |
50G's peak |
| Power |
Voltage |
+12Vdc ± 10%
+5Vdc ± 7% |
Ripple |
+12V: 100mV pk-pk
+5V : 100mV pk-pk |
Current (max) |
1.40A @ + 12V
1.30A @ + 5V |
| Acoustic Level |
Idle |
Operational |
45dBA max |
50 dBA @ 3ft |
Jumper Settings
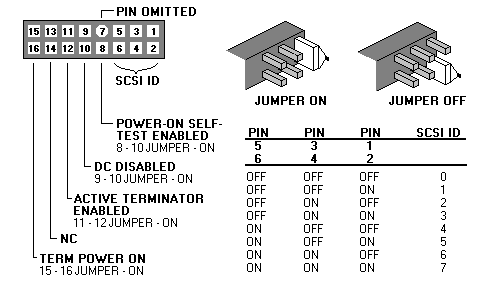
Default settings - SCSI ID 2, Power-on Self Test Enabled,
rest are all OFF
NOTE: On the CTD8000R-S it has the above jumpers on the rear of the
drive, also it has a switch block on the underneath of the drive. Both the switches and
jumpers can be used.

|

