 |
|
||||||||||||||||||||||||||||||||||||||||||||||||||||||||||||||||||||||||||||||||||||||||||||||||||||||||||||||||||||||||||||||||||||||||||||||||||||||||||||||||||||||||||||||||||||||||||||||||||||||||||||||||||||||||||||||||||||||||||||||||||||||||||||||||||||||||||||||||||||||||||||||||||||||||||||||||||||||||||||||||||||||||||||||||||||||||||||||||||||||||||||||||||||||||||||||||||||||||||
 |
 |
Bank 0 |
Bank 1 | Total Memory | ||
Socket 0 |
Socket 1 |
Socket 0 |
Socket 1 |
|
4 MB |
4 MB |
8 MB |
||
4 MB |
4 MB |
4 MB |
4 MB |
16 MB |
8 MB |
8 MB |
16 MB |
||
8 MB |
8 MB |
4 MB |
4 MB |
24 MB |
8 MB |
8 MB |
8 MB |
8 Mb |
32 MB |
16 MB |
16 MB |
32 MB |
||
16 MB |
16 MB |
4 MB |
4 MB |
40 MB |
16 MB |
16 MB |
8 MB |
8 MB |
48 MB |
16 MB |
16 MB |
16 MB |
16 MB |
64 MB |
32 MB |
32 MB |
64 MB |
||
32 MB |
32 MB |
4 MB |
4 MB |
72 MB |
32 MB |
32 MB |
8 MB |
8 MB |
80 MB |
32 MB |
32 MB |
16 MB |
16 MB |
96 MB |
32 MB |
32 MB |
32 MB |
32 MB |
128 MB |
![]()
![]()
| 3Com 10/100 PCI card (3C595TX) | XB54991 |
| 3Com EISA Combo card (3C592) | XB54993 |
| 3Com EISA card (3C579-TP) | XB52591 |
| 3Com AUI to UTP Transceiver (3C583) | XB50900 |
| IBM Token Ring LAN card | XB42148 |
![]()
![]()
| MB | Make | Model | Type | Part Number |
| 540 | Quantum | LPS 540 S | SCSI II | SU52869 |
| 1 GB | IBM | DPES 31080 | SCSI II | SU54094 |
| 2 GB | IBM | DFHS S2F | SCSI II | SU54096 |
| 4 GB | Quantum | Atlas XP34300 | SCSI II | SU56855 |
| 5 GB | IBM | DFHS S5F | SCSI II | SU54099 |
| Tape | ||||
| 4-16GB | Conner | CTD8000R-S | SCSI | SU54778 |
| 525 | Archive | Viper525 | SCSI | SU52601 |
| 1.6-3.2GB | Conner | CTM3200R-S | SCSI II | XB54027 |
| Floppy | ||||
| 1.2Mb | Panasonic | JU-475-5 | 5.25" | SU52600 |
![]()
![]()
Motherboard Jumper Settings
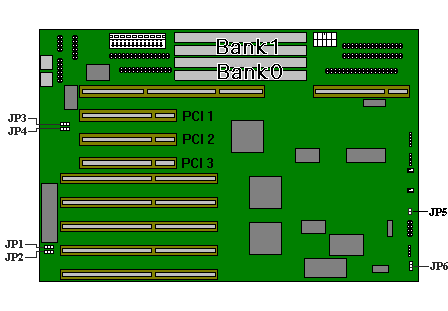
Jumper |
Setting |
Function |
JP1 |
1 - 2 | Reserved |
| 2 - 3 * | Default | |
JP2 |
1 - 2 | Power-on password enabled |
| 2 - 3 * | Power-on password disabled | |
JP3 |
1 - 2 * | DMA request 1 (DREQ1) |
| 2 - 3 | DMA request 3 (DREQ3) | |
JP4 |
1 - 2 * | DMA acknowledge 1 (DACK1) |
| 2 - 3 | DMA acknowledge 3 (DACK3) | |
JP5 |
Open | Reset button disabled |
| Closed * | Reset button enabled | |
JP6 |
1 - 2 * | Audio to buzzer |
| 2 - 3 | Audio to speaker | |
| * - default setting. | ||
Single Pentium (3.3V) CPU Board

Jumper |
Setting |
Function |
CPU Type |
1 - 2 (default) |
For Pentium 60/90 or Pentium 66/100 Pentium 50/100 Note: 60/90 means that the external bus frequency is 60 MHz and the CPU internal operating frequency is 90 MHz . Similarly for 66/100 and 50/100. |
Dual Pentium (3.3V) CPU Board
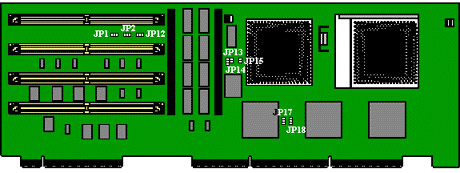
Jumper |
Setting |
Function |
Cache Size |
1 - 2 |
256 KB 512 KB |
JP13 |
1 - 2 |
512 KB 256 KB |
Jumper |
Setting |
Function |
CPU Type |
1 - 2 (default) |
For Pentium 60 / 90, Pentium 66 / 100 For Pentium 50 / 100 120, 133, 150, 166 |
JP3 |
1 - 2 |
90, 100, 120, 133MHz |
2 - 3 |
150, 166MHz |
Jumper |
Setting |
Function |
SRAM Type |
1 - 2 (default) |
Standard Synchronous |
JP14 |
Closed (default) |
Standard Synchronous |
JP15 |
Closed (default) |
Standard Synchronous |
JP17, JP18 |
1 - 2 (default) |
Standard Synchronous Note: Setting 1 - 1 means to short pin 1 of JP17 and pin 1 of JP18 together. Setting 2 - 2 means to short pin 2 of the two jumpers together. |
![]()
![]()
| Specialix serial cards | |
| 32-port ISA SI/XIO serial card | XB54693 |
| 4 port terminal adapter | XB43319 |
| 8 port terminal adapter | XB43320 |
| 32-port EISA XIO serial card | XB54610 |
| 8 port modular terminal adapter | XB54611 |
| 8 port modular terminal adapter (7 RS232, 1 parallel) | XB54612 |
| 128-port EISA RIO serial card | XB54613 |
| 8 port remote terminal adapter | XB54614 |
| 8 port remote terminal adapter (7 RS232, 1 parallel) | XB54615 |
| Raid | |
| DPT PM 3224 SmartRaid upgrade for FT//ex 1000 comprising controller card and hot plug backplane. |
UD54666 |
| DPT PM3224 SCSI SmartRAID PCI connector 3 channel & hot swap drive backplane |
UE56125 |
| SCSI Controller | |
| SCSI Controller card for over four drives | UD55556 |
| UPS power supply | |
| APC Smart UPS AP9001 (900VA) | UD54642 |
| Processor Upgrades | |
| Single to dual Pentium at 90MHz | UE56135 |
| Single to dual Pentium at 120MHz | UE56136 |
| Single to dual Pentium at 150MHz | UE56699 |
| Single 120MHz upgrade for 90MHz | UE56700 |
| Single 150MHz upgrade for 90/120MHz | UE56698 |
![]()
![]()

![]()
![]()
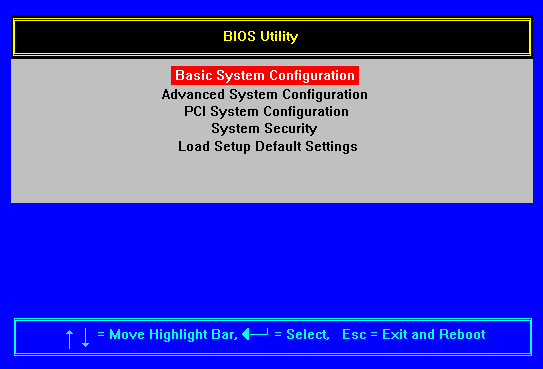
To enter the CMOS Setup screens press CTRL+ALT+ESC after boot-up. The BIOS Setup Utility main menu appears:
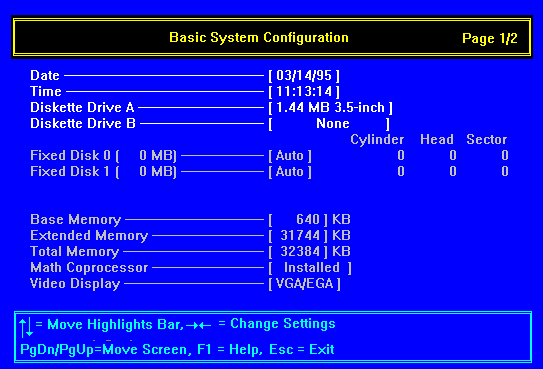

Date and Time
The real time clock keeps the system date and time. After setting the date and time, you need not enter them every time you turn on the system unit. As long as the internal battery remains good and connected, the clock continues to keep the date and time accurately even when the power is off.
Diskette Drives
To enter the configuration value for the first diskette drive (drive A), highlight the Diskette Drive A parameter. Press the left or right arrow key to view the options and select the appropriate value.
The Diskette Drive parameters have the following options:
Not present
360 KB, 5.25-inch
1.2 MB, 5.25-inch
720 KB, 3.5-inch
1.44 MB, 3.5-inch
2.88 MB, 3.5-inch
Follow the same procedure for the Diskette Drive B parameter. Choose None if you don't have a second diskette drive.
Fixed Disk Drives
In this implementation all systems are equipped with a SCSI controller and hard disk drive, all settings in this section are ignored.
System Memory
The system automatically detects the total amount of on-board memory during the power-on self test (POST) and sets the memory parameters accordingly. If you install additional memory, the system automatically adjusts the Total Memory parameter to show the new memory size.
Math Coprocessor
The CPU includes a math coprocessor so this parameter shows installed by default.
Video Display
The video display is the monitor on which the operating system prompt appears when you boot the system. The system automatically detects the video mode of your primary display and sets the configuration value accordingly.
Communication Status
The Communication Status parameters let you set the baud rate, parity, stop bit and data length for the first serial port (COM 1). The values for this parameters are:
Baud Rate: 110 to 9600 bits per second (BPS)
Parity: odd, even, or none
Stop bit: 1 or 2 stop bits
Data length: 7 or 8-bit data word
There is one restriction on the options available for the communication status parameters. If your data length parameter is an 8-bit data word, you must select one of the following combinations:
1 stop bit and odd or even parity
2 stop bits and no parity
The default values are 9600 BPS, odd parity, 1 stop bits, and 8-bit data word.
Enhanced IDE Features
IDE Fixed Disk Block Mode
This option has no effect on SCSI systems.
Large Hard Disk Capability
This option has no effect on SCSI systems.
Advanced PIO Mode
This option has no effect on SCSI systems.
Num Lock After Boot
This parameter allows you to activate the Num Lock upon booting.
Memory Test
When set to Enabled, this parameter lets the system perform a RAM test during the power-on self test (POST) routine. Set to Disabled, the system detects only the memory size and bypasses the test routine. The default setting is Enabled.
Auto-configuration Mode
Set this parameter to Enabled if you do not know the fixed disk drive type parameters and the onboard communication port configuration. When enabled, this parameter sets to the optimised system configuration values. The default setting is Enabled.
Fast Boot Mode
This parameter allows the system to boot faster by skipping some POST routines. If enabled, it sets the system speed to High, and enabled Shadow RAM, and primary and secondary-level cache. The default setting is Disabled.


Shadow RAM
The system reserves 384 KB of random access memory (RAM) for the shadow RAM function. This parameter has five range addresses. The address F0000h - FFFFFh is for system BIOS and C0000h - C7FFFh is for shadowing video BIOS. The remaining address ranges are for I/O ROM functions. When you set these addresses to Enabled, the system BIOS, video BIOS and I/O ROM functions run directly from the shadow RAM for faster operation. When set to Disabled, the functions run normally from ROM
Internal Cache (CPU Cache)
This parameter enables or disabled the internal cache memory. The default setting is Enabled.
External Cache
This parameter enables or disables the external cache memory. The default setting is Enabled.
Cache Scheme
This parameter sets the cache to Write-through or Write-back modes. Write-back updates the cache but not the memory when there is a write instruction. It updates the memory only when there is an inconsistency between the cache and the memory. Write-through updates both the cache and the memory whenever there is a write instruction.
System Memory Parity
This parameter allows you to enable or disable the optional parity DRAM onboard. However, you must disable this parameter if you installed SIMM's without parity in the system.
Memory at 15MB - 16MB
To prevent memory address conflicts between the system and expansion boards, reserve this memory range for the use of either the system or an expansion board. Before setting this parameter, check your add-on card manual to determine if your add-on card needs this memory space. If not set this parameter to System Use.
E0000h - FFFFFh (System BIOS)
If the System BIOS parameter is set to Enabled, you may select Cacheable or Non-cacheable for the E0000h - FFFFFh parameter. When set to Cacheable, it allows the system BIOS to run directly from the cache memory. The system operates faster. When set to Non-cacheable, it lets the system BIOS run from RAM.
C0000h - C7FFFh (Video BIOS)
If the Video BIOS parameter is set to Enabled, you may select Cacheable or Non-cacheable for the C0000h - C7FFFh parameter. When set to Cacheable, it allows the video BIOS to run directly from the cache memory. The system operates faster. When set to Non-cacheable, it lets the video BIOS run from RAM.
BIOS Version less than R03-B0

BIOS Version equal or greater than R03-B0
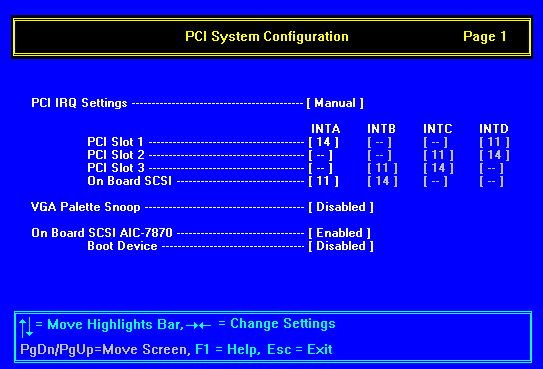
PCI Slot Number
This parameter lets you specify the PCI slot to configure based on the following sub items. When you have set the values for the PCI slots, each selection displays the values that you set for the sub items.
Function Number of Device
This parameter tells the system if a single-function or multifunction card is installed. If you installed a single-function card in the system, this parameter is automatically set to 0. The other function number settings are reserved for multifunction cards.
Device Function
When set to Enable, the system activates the PCI device function specified in the parameter Function Number of Device upon booting. When set to Disabled, the system boots without activating the device even if it is installed in the slot.
Bus Master
This item lets you control the PCI device's ability to act as a bus master. Set this to Enabled to allow the device to act as a bus master. Set to Disabled, the device cannot generate PCI accesses.
IRQ Level for INTA Pin
This parameter assigns the IRQ level for each interrupt pin of the PCI slots. You can assign any of the following available IRQ levels: 3, 5, 9, 10, 11, 14, and 15.
Each PCI slot supports 4 interrupt pins. The INTA pin is automatically reserved for Function Number 0 (master function). The remaining interrupt pins (INTB, INTC, and INTD) are reserved for multifunction cards. Refer to your card manual for the interrupt pin assignments.
Onboard SCSI AIC-7870
This parameter allows you to enable or disable the onboard SCSI function. Enable this parameter if you installed a SCSI device. The default is Disabled.
Boot Device
During POST, the normal booting procedure starts with the initialisation of the ISA card, followed by the PCI card, then the onboard SCSI, if present. Enabling this parameter changes the normal booting sequence of the system, doing the SCSI initialisation prior to add-on PCI card initialisation. You can only set this parameter if the Onboard SCSI parameter is set to Enabled. The default setting is Disabled.
IRQ Level for INTA Pin
This item assigns the IRQ for the onboard SCSI interrupt pin. To avoid IRQ conflicts, make sure that the assigned IRQ for the onboard SCSI has not been assigned to other devices.
VGA Palette Snoop
PCI devices support the "palette snooping" technique that enables the device control access to their palette registers.
Set this parameter to Enabled to activate the palette snooping function in the PCI VGA devices installed in your system. Check your VGA card manual for more information about this function.
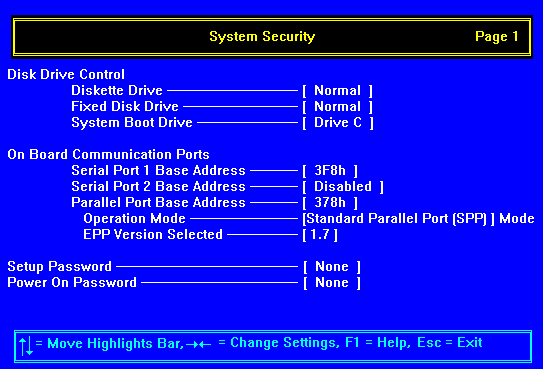
Disk Drive Control
The disk drive control features allow you to enable or disable the read/write functions of a disk drive. These features can also control the diskette drive or fixed disk drive boot function to prevent loading operating systems or other programs
Diskette Drive
Setting |
Description |
| Normal | Diskette drive functions normally |
| Write Protect All Sectors | Disables the write function on all sectors |
| Write Protect Boot Sector | Disables the write function only on the boot sector |
| Disabled | Disables all diskette functions |
| Fixed Disk Drive | |
| Normal | Fixed disk drive functions normally |
| Write Protect All Sectors | Disables the write function on all sectors |
| Write Protect Boot Sector | Disables the write function only on the boot sector |
| Disabled | Disables all fixed disk functions |
| System Boot Drive | |
| Drive A then C | System boots from drive A to C |
| Drive C then A | System boots from drive C to A |
| C: | System always boots from drive C |
| A: | System always boots from drive A |
Onboard Communication Ports
Serial Ports
This parameter enables the serial ports and sets their address.
Setting |
Function |
||
| Serial 1 (3F8h) | COM 1 with address 3F8h | ||
| Serial 2 (2F8h) | COM 2 with address 2F8h | ||
| Serial 3 (3E8h) | COM 3 with address 3E8h | ||
| Serial 4 (2E8h) | COM 4 with address 2E8h | ||
| Disabled | Disables serial port 1 | ||
| NOTE: If an UPS is fitted, serial port 2 is used by the UPS interface. | |||
| Parallel Port | |||
| The system has one parallel port. The table below lists the options for selecting the parallel port address. | |||
Setting |
Function |
||
| 3BCh | Corresponds to the parallel port with address 3BCh | ||
| 378h | Corresponds to the parallel port with address 378h | ||
| 278h | Corresponds to the parallel port with address 278h | ||
| Disabled | Disables the parallel port | ||
| Parallel Port Operation Mode Settings | |||
Setting |
Function |
||
| Standard Parallel Port (SPP) | Allows normal speed operation but in one direction only | ||
| Enhanced Parallel Port (EPP) | Allows bi-directional parallel port operation at maximum speed | ||
| Extended Capabilities Port (ECP) | Allows parallel port to operate in bi-directional mode and at a speed higher than the maximum data transfer rate | ||
| Standard and Bi-directional | Allows normal speed operation in a two-way mode | ||
Setup Password
The Setup Password prevents unauthorised access to the Setup Utility.
Power-on Password
The Power-on Password secures your system against unauthorised use. Once you set this password, you have to type it whenever you boot the system.
Load Setup Default Settings
This option loads the default values of the system configuration parameters. These values are the optimised system configuration settings.
Enabling the Auto Configuration Mode and the Fast Boot Mode parameters under the Basic System Configuration menu allows this function to set the system speed, shadow RAM, cache, and other system parameters to their default settings.
![]()
![]()
![]()