 |


|
|
Upgrades - MS Series Add-In
Cards Your computer can accept various expansion cards
or boards. Most are simple to install with the benefit of the 'Plug and Play' features of
Windows 95 (look out for the 'Plug and Play' symbol on the packaging of these add-in
boards).
You can extend the capabilities of your computer, for example:
- A graphics/movie card can provide more specialised video functions than
those offered by the on-board EVGA system.
- A network card can provide a connection to other computers.
- A television card can enable you to watch TV on your monitor and capture
individual frames.
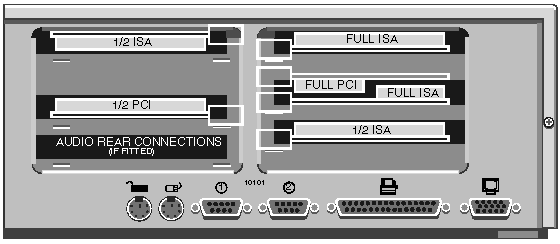
The Apricot MS series computer has room for five expansion boards:
These can be plugged into the internal riser card as shown in this rear
view (the blanking plates have been removed for simplicity of showing the layout).
Installing the card
The only tool required for adding cards into your computer is a small cross-head
screwdriver.
- Turn off the computer and unplug all power cords.
- Take suitable anti-static precautions and
remove the system unit cover.
At the rear of the system unit are
metal blanking plates, one for each expansion card slot. Opposite the blanking plates, at
the front of the system unit, there are card guides. These ensure that the front edge of a
full length card is supported securely.

Decide which of the available slots you wish to install the card into,
taking into account the type of card (ISA or PCI) and then its length (full or half
length).
- Remove the blanking plate of the chosen slot by removing its securing
screw. On the power supply side, remove the security plate, then slide the blanking plate
out of its slot. Keep all the screws as these will be required later to secure the card.
- Slide the card into the slot ensuring that the card edge connector
engages correctly with the socket on the riser board. Do not use excessive force.
- Secure the card by replacing the screws removed in step 3.
- Connect any necessary internal cables to the card (see manuals supplied
with the card if you are unsure).
- Replace and secure the system unit cover, reconnect power cables.
Before switching on your computer, read the manuals supplied with the
card. If you are certain all is correct, switch on your computer.
Configuring the card
If the card you have just installed is a 'Plug and Play' card, then the configuration of
the card is automatically done by Windows 95. When you turn your computer on, Windows 95
will automatically detect the card (check the manuals supplied with the card for any
Windows 95 installation procedures specific to the card).
If the card is not a 'Plug and Play' card then Windows 95 may or may not
automatically detect it. If Windows 95 does not automatically detect the card then
the following steps can be followed :
- Click on the Start button, move the cursor up to Settings, then move the
cursor to Control Panel, click the left mouse button. This will load the Control Panel
window.
- Double click on the Add New Hardware icon. This will load the Add New
Hardware wizard.
- Click on Next to begin installing your new hardware.
- On the next screen make sure Yes (Recommended) is selected and then click
on Next to carry on.
- On the next screen click on Next to start the detection process.
The detection process takes about 10 minutes to complete
- Once completed, click on Details to check that Windows 95 has detected
your new card.
- If Windows 95 has detected your card correctly, click on Finish; if it
hasn't then click on Cancel and contact the company you purchased the card from for
further assistance.
Problems
Hopefully you will not experience any problems when adding cards into your computer, but
if you do then there are a few things you can check.
- Click on the Start button, move the cursor up to Settings, then move the
cursor to Control Panel, click the left mouse button. This will load the Control Panel
window.
- Double click on the System icon, this will load the System Properties
window.
- Click on the Device Manager tab, this will show you all the hardware that
Windows 95 can see in your computer.
- Click on the card you have just installed (there should be a yellow
circle with an exclamation mark on it if you have a problem), and click the Properties
button.
This will display a properties window for your card.
- Click on the Resources tab, this will show you the settings for your card
(if not click on the Set Configuration Manually button).
- Windows should now be displaying items such as Interupt Request,
Input/Output Range, etc. It is not that important to know what these mean, but it is
important that these settings aren't the same as any other hardware in your computer
(rather like the postal address of your house, if two houses in the same town have the
same address, then your mail may end up at the wrong house), and luckily Windows 95 tells
you if it is conflicting with anything in the Conflicting Device list:.
If you are reading this section then you should have some sort of conflict displayed in
this list.
- To changed the item that is conflicting, click on the tick next to Use
Automatic Settings until it disappears.
- Double click on the blue square next to the item that is conflicting,
this will bring up an Edit box.
- Using the up and down arrows at the right of the Value box, change the
value until you get 'No devices conflicting' in the Conflicting Information box.
- Click OK to close the edit window.
- Click OK to close the Properties window.
Windows
will display a warning message about you having changed the settings - click on OK to
continue.
- Click Close to close the System Properties window.
Windows may prompt you to reboot your computer before the changes can take effect
- if so, click on the Yes button.
Your card should be working with Windows 95 correctly now. Refer to the
manuals supplied with the card for installing any software required to utilise your card.


|