Mitsubishi Electric - Computing for a Connected World Insight CD Home Page

Products
Services
Knowledgebase
Upgrades
MS Series Hardware Upgrades
Memory, cache & video RAM options
Downloads
Search Insight
E-Mail us
Insight Service
Year 2000
Other Mitsubishi Sites
Site Disclaimer


Upgrades - MS Series Memory

Upgrading the memory in your Apricot MS series computer

It is very important that before you purchase a memory upgrade for your MS Series computer, you need to make sure that the memory you purchase will work.  Below is a list of supported upgrade options.

Before upgrading your computer, make sure that you have identified your computer's Model Number.

When you have identified your computers model number correctly, click on the correct model for detailed and specific information about upgrading that particular model.

Select Correct Model Number

  1. MS530 - Model number MK
  2. MS540 - Model number MT
  3. MS540 - Model number MM
  4. MS660 - Model number MF
  5. MS500 - Model number MW
  6. MS600 - Model number MV

MS530, MS540 & MS660 (Models MK, MT, MM & MF) Memory Upgrades

The motherboard in your computer is fitted with sockets for up to four SIMMs (Single In-line Memory Modules). The SIMM sockets are located at the front of the motherboard. 60ns EDO SIMMs with capacities or 4, 8, 16 or 32 Mbytes are supported, giving a maximum capacity of 128 Mbytes.

There are two pairs or banks of sockets. The sockets labelled MM1 and MM2 form Bank 1 and the sockets labelled MM3 and MM4 form Bank 2.

Possible Memory Configurations
You can only upgrade the memory in your computer as per the table below - however, please note that SIMMs must be installed in pairs. In most cases, your computer will have been supplied with two SIMMs, fitted in MM1 and MM2. Upgrading your computer can then be achieved by installing a second pair of SIMMs into the sockets labelled MM3 and MM4. If all four sockets are already filled with SIMMs, you will have to remove the pair of SIMMs in MM1 and MM2, or MM3 and MM4, and replace them with larger capacity SIMMs to upgrade the memory. For more information about fitting the extra memory read the Installing your memory upgrade section.

Total Memory Bank 1 sockets Bank 2 sockets
MM1 MM2 MM3 MM4
  8 MB  4 MB  4 MB - -
 16 MB  4 MB  4 MB  4 MB  4 MB
 16 MB  8 MB  8 MB - -
 24 MB  8 MB  8 MB  4 MB  4 MB
 32 MB 16 MB 16 MB - -
 40 MB 16 MB 16 MB  4 MB  4 MB
 48 MB 16 MB 16 MB  8 MB  8 MB
 64 MB 16 MB 16 MB 16 MB 16 MB
 64 MB 32 MB 32 MB - -
 72 MB 32 MB 32 MB  4 MB  4 MB
 80 MB 32 MB 32 MB  8 MB  8 MB
 96 MB 32 MB 32 MB 16 MB 16 MB
128 MB 32 MB 32 MB 32 MB 32 MB


Installing your Memory
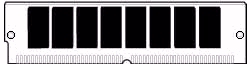
 Upgrade
It is important to note that you must be confident enough to perform this upgrade, if you have doubts contact your supplier.

Take the SIMM out of its anti-static packaging. Hold it by its edges and avoid touching the metal contacts.

SIMMs are not symmetrical. There is a small notch at one end and another slightly off-centre along the connection edge, as shown above. These mean that the SIMM will only fit one way.

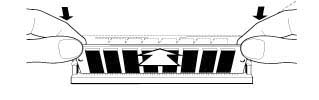
Place the SIMM in the socket at a 15 degree angle to the vertical.

Pushing gently on its top corners, stand the SIMM upright in the socket until the pegs of the socket engage in the holes at each end of the SIMM and the metal clips on the socket are holding both ends of the SIMM firmly in position. Do not use excessive force.

If the SIMM will not fit easily, remove it, check that you have got it the right way round, and start again.

Repeat these steps for each SIMM you want to install.

Reconfiguring your System
The first time you turn on the computer after adding or removing SIMMs, the memory change will be automatically detected by the POST (Power On Self Test). All you have to do is confirm and save the new memory configuration in the BIOS set-up utility.

If an error message occurs, check that you have:

  1. Installed a configuration supported in the list above.
  2. Correctly fitted the SIMMs in their slots.
  3. Used SIMMs of the correct type.

MS500 (Model MW) Memory Upgrades

The motherboards two DIMM sockets accept DIMMs (Dual In-line Memory Modules) of up to 128 Mbytes in any combination (giving a maximum memory capacity of 256 Mbytes).

Technical Note
The DIMMs you use must have the following specification: gold contacts, 3.3V, 64-bit, unbuffered, SDRAM-type with Serial Presence Detect (SPD) and a CAS latency of 2 at 66 MHz. If you use any other type of DIMM you risk damaging the motherboard.


MS600 (Model MV) Memory Upgrades

The motherboard’s three DIMM sockets accept DIMMs (Dual In-line Memory Modules) of up to 128 Mbytes in any combination (giving a maximum memory capacity of 384 Mbytes). The slot nearest to the processor is recommended to be used first.

Technical note
The DIMMs you use must have the following specification: gold contacts, 3.3V, 64 or 72-bit, unbuffered, SDRAM-type with Serial Presence Detect (SPD) and a CAS latency of 2 at 66 MHz. If you use any other type of DIMM you risk damaging the motherboard.

The ECC capabilities of 72-bit DIMMs will only operate if all the DIMMs in the system are 72-bit.


Back to Top Back to Top


Computing for a Connected World