FT4200 Hard Disk Drives and Modules (Rel 1.12.1)Warning
Read completely the instructions detailed in Preliminary
Service Information.
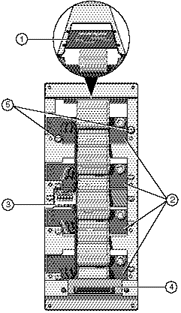
Hard Disk Drive
Your Apricot is equipped with SCSI hard disk drives which are hot
pluggable, i.e. you can remove or fit them while the system is powered up. Use the
following instructions if a specific hard disk needs to be replaced. You can identify a
specific drive by observing the labelling scheme as shown in the following illustration:
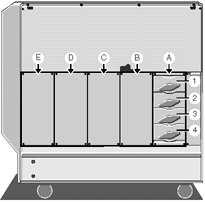
In addition to the external labelling scheme, (the disk numbers within
any module follow the same scheme) each SCSI drive, including the removable media drives,
is assigned its own SCSI identification number.
As the system boots up, a list will appear for each SCSI adapter,
listing the drives attached to it. It will also give drive SCSI identification numbers,
along with brief details of each drive.
Caution
It may be wise to keep a separate written record of which trays are
fitted with drives. alongside their specification and then update this record with any
changes or additions.
Removing a drive
Turn the hard disk tray release handl anti-clockwise until it stops,
which is almost one complete turn. As you turn the handle, the tray ejects slightly.
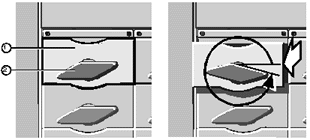 |
| 1 |
Disk Drive Tray |
2 |
Disk Tray Release Handle |
|
If you are removing the disk while the system is powered up, wait at
least 10 seconds to allow the disk to stop spinning and the heads to park before
continuing with this procedure.

Slide the tray out carefully until it is free of the chassis.
4. Place the assembly into suitable packaging.
Note
Since the hard disk drives for your Apricot are exclusively SCSI
drives, it is important to note that the SCSI connector on the backplane of the drive
module contains the device address. This means that, for a given connector, any disk drive
that is fitted to that connector will have the same SCSI address.
Fitting a replacement drive
Warning
The drive and tray require very accurate assembly or damage can be
caused to the connections. This is done in the factory using special equipment. Damage may
be caused by inaccurate assembly on site, which may invalidate your warranty.
1. Carefully unpack the new, ready assembled drive and tray from
its protective packaging.
Avoid touching the electronic control board or the connectors at the
rear of the drive.
2. Ensure that the release handle on the tray is turned anti-clockwise
as far as it will go.
3. Insert the tray into the drive module and push it carefully in until
it reaches the point where the hard disk release handle will engage. You must not knock or
jolt the hard disk drive.
4. Turn the hard disk release handle clockwise almost one complete turn
until the tray metalwork is flush with the drive module. This procedure plugs the hard
disk into the connectors on the drive module backplane.
Hard Disk Drive Module
The hard disk drive module is the removable metal framework which holds
up to four hard disk drives. The server’s disk chamber can accommodate up to five of
these modules. Removal of a module will usually only be necessary if the circuit board on
the module backplane fails.
Note
You will need to ensure that both side panels are removed
before attempting to remove or fit a drive module.
Removing
1. Remove all hard disk drives which may be fitted to the module in
question (see "Hard Disk Drive, Removing", earlier in this chapter). Make a
careful note of which drive tray is removed from which slot.
2. In the electronics chamber, unplug the data ribbon cable from the
connector on the back of the module. The connector is visible through an opening in the
centre spine.
Caution
It is vital that you remember the exact cable and connector
arrangement of your hard disks, particularly if you are using a RAID (Redundant Array of
Independent Disks) configuration. If you fail to restore the arrangement so that all
cables and plugs are as they were originally, you risk losing all the data on your hard
disks.
 |
| 1 |
Hard Disk Module Data Connector |
2 |
Ribbon Cable |
|
Note
One of the connectors, located underneath the cooling fan assembly,
is less accessible than the others. If it is difficult to unplug this connector in the
electronics chamber, feed the ribbon cable carefully through the centre spine opening.
Then unplug the connector in the disk chamber.
Remove the four securing screws, as shown in the following diagram:
 |
| 1 |
Empty Disk Drive Module |
2 |
Securing Screws |
|
4. Slide the module gently out. You will feel a little initial
resistance as the backplane power connector unplugs from its socket on the centre spine of
the server.
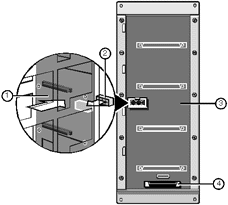
Hard Disk Drive Module Backplane
The backplane on a hard disk drive module consists of seven small
circuit boards which are fastened with screws to the metal framework and connected to each
other by a flexible ribbon cable. The following illustration identifies the various boards
on the backplane:
 |
| 1 |
Removable Media Drive SCSI Interface Board |
4 |
Data Connector Board |
| 2 |
Hard Disk Drive Boards |
5 |
Fastening screws |
| 3 |
Power Distribution Board |
|
|
|
Removing
There are two fastening screws for each board except the removable media
drive SCSI interface board, which has four. To remove the backplane:
1. Remove all disk drives from the module.
2. Remove the fastening screws from all the boards.
3. Push each of the boards, except the data connector board, towards the
interior of the module and manoeuvre it as necessary until it can be freed from the
framework.
4. Lift the backplane away.
Fitting
1. Manoeuvre the boards of the backplane through the back openings into
the interior of the framework so that they can be positioned properly.
2. Fasten all the boards to the module framework as shown in the
previous diagram.
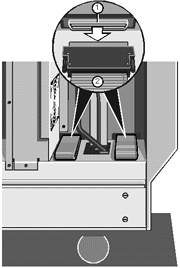
Jumper Settings for the Removable Media SCSI Interface Board
Each module backplane contains a removable media SCSI interface board,
positioned at the top of the module. However, the removable media drives are now
controlled on a SCSI cable direct from the motherboard.
There are two jumpers on the interface board, as shown in the following
diagram:
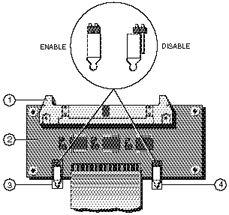 |
| 1 |
SCSI Connector |
3 |
Jumper J1 |
| 2 |
Interface Board |
4 |
Jumper J2 |
|
Both jumpers, J1 and J2, must be in the correct positions for the system
to work properly, according to the following instructions:
J1 determines whether a delayed spinup occurs in this module.
Delayed spinup means that the installed drives will not start spinning simultaneously
after you switch the server on. Instead, the drives start one at a time with a specific
number of seconds between each one. This delay prevents the excessive power drain that
would otherwise occur if all drives started at the same instant. Therefore, this jumper
should always be in the enabled position.
J2 determines where the SCSI bus terminates. Set it to the disabled
position. It will only ever need to be enabled if the removable media drive bay has to be
controlled from this individual SCSI bus.
Refitting the drive module
1. Slide the drive module into place as far as it will go, at the same
time guiding the data connector through the opening in the centre spine.
2. Now reach inside the module and push gently on the power circuit
board on the backplane to ensure that its connector is seated properly into the power
socket on the centre spine.
The power circuit board lies in the centre of the backplane in each
module as shown in the following diagram:
Now use the four screws to fasten the module to the subsystem metalwork
in the drive chamber.
|
| 1 |
Empty Disk Drive Module |
2 |
Securing Screws |
|
In the electronics chamber, plug the appropriate ribbon cable onto the
data connector on the backplane of the drive module:
 |
| 1 |
Hard Disk Module Data Connector |
2 |
Ribbon Cable |
|
Caution
It is vital that you remember the exact cable and connector
arrangement of your hard disks, particularly if you are using a RAID (Redundant Array of
Independent Disks) configuration. If you fail to restore the arrangement so that all
cables and plugs are as they were originally, you risk losing all the data on your hard
disks.


|
