FT4200 Motherboard (Rel 1.12.1)Warning
Read completely the instructions detailed in Preliminary
Service Information.
This chapter details the removal and refitting of the Motherboard,
additional processor board and associated Power board. Each one has a separate procedure.
System motherboard
Removing
1. Unplug all external cables and leads from the system back panel
connectors (i.e. serial, parallel, video, keyboard, mouse) on the motherboard and from any
expansion cards.
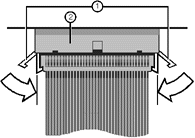
Remove the screws which secure the metal plate over the electronics
chamber. The screws are along the top and right edges of the plate as shown in the
following illustration:
 |
| 1 |
Protective Metal Plate |
2 |
Securing Screws |
|
Caution
It is vital that you remember the exact cable and connector
arrangement of your hard disks, particularly if you are using a RAID (Redundant Array of
Independent Disks) configuration. If you fail to restore the arrangement so that all
cables and plugs are as they were originally, you risk losing all the data on your hard
disks.
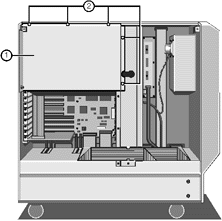
Rotate the right edge of the plate slightly towards you and unhook the
left edge. Removing the plate uncovers the motherboard:
 |
| 1 |
Support / retaining strut |
6 |
Busbars to Power supply |
| 2 |
Termination/extra CPU card |
7 |
SMIC card (bottom slot) |
| 3 |
Aux. power connection |
8 |
SMIC cable to power board |
| 4 |
Hard Disk SCSI Cable |
9 |
Power board connections |
| 5 |
Remov. media SCSI cable |
|
|
|
Remove six screws from the periphery of the subplate which surrounds the
serial, parallel and video connectors on the back panel of the server.
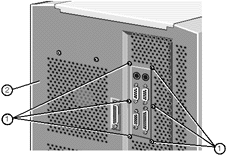 |
| 1 |
Fixing screws |
2 |
system rear panel |
|
Now remove the System Management Interface Card (SMIC). Unplug its
ribbon cable, which is attached to the distribution board at the top of the electronics
chamber, using the ejector latches fitted to the sockets.
 |
| 1 |
Cable retaining latches |
2 |
Ribbon cable socket |
|
6. Remove the termination board, or, if fitted, the metal strut which
supports the additional CPU card. There is a single screw on one end of the strut with a
hook on the other. Then remove the CPU card.
7. Remove and put in a safe place, any fitted expansion boards.
Caution
All boards and assemblies should be placed on an antistatic surface
or within an antistatic container as they are removed from the server.
8. Unplug the DC power connectors. One from the power distribution panel
at the top of the electronics chamber, then the other from the lower right hand side
(direct from the PSU).
9. Unplug the data ribbon that connects to the power distribution panel.
Again, use the ejector latches.
10. Unplug the Floppy Drive connector.
11. Unplug the two SCSI interface cables from the connectors at the
bottom of the motherboard.
12. Using an M5 socket, release the five busbar connections at the base
of the motherboard.
Now remove 21 screws which secure the board to the centre spine
of the server, as shown:

Caution
When refitting the motherboard, due to the very high operating
frequencies of modern systems, it is extremely important that all of the mounting screws
are refitted to ensure effective grounding to the server metalwork over the whole board
area.
Lift the motherboard gently off the support lug at the top right corner
in the electronics chamber and place on a suitable antistatic surface.
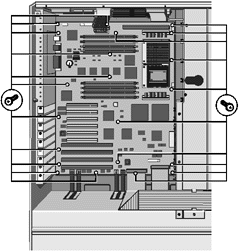
Ports sub-plate
If the motherboard is being replaced, the metal sub-plate supporting and
identifying the rear ports must be removed to be fitted to the new motherboard.
Carefully remove the port fixing bolts and lift the plate clear.
 |
| 1 |
Top right corner of m’board |
3 |
Ports sub-plate |
| 2 |
Ports on motherboard |
4 |
Port mounting bolts |
|
Fitting the Motherboard
1. Replace the six screws which secure the connector sub-plate, on the
back panel, to the server chassis.
Attach the motherboard to the centre spine of the server using the 21
screws as shown in the following illustration:
Reconnect the hard disk cable from the drive module to the appropriate
connector as it was originally.
Caution
It is vital that you remember the exact cable and connector
arrangement of your hard disks, particularly if you are using a RAID (Redundant Array of
Independent Disks) configuration. If you fail to restore the arrangement so that all
cables and plugs are as they were originally, you risk losing all the data on your hard
disks.
5. Plug the Floppy Drive and Front Panel cables into their respective
connectors.
6. Plug the DC power cables into their respective connectors on the
power distribution board at the top of the electronics chamber. These connectors are keyed
and cannot be plugged incorrectly. Do not use force; you may be trying to plug a
cable into the wrong connector.
7. Replace the bus termination board or the additional CPU card (plus
its support strut).
8. Replace any expansion cards and their appropriate ribbon cables.
Replace the SMIC card in the lowest EISA slot and plug its cable into
the power distribution board at the top of the electronics chamber. Ensure the plug is
firmly fixed into the socket using the latches.
 |
| 1 |
Cable retaining latches |
2 |
Ribbon cable socket |
|
10. Using a torque wrench set to 5 Nm, connect up and tighten the busbar
connections at the base of the motherboard.
11. Refit the auxiliary power supply cable to the lower right hand side
power connector.
12. Ensure all the processors and memory modules are refitted correctly.
13. Hook the left edge of the protective metal plate in place and secure
the plate to the server chassis using the screws along the top and right edges.
14. Reconnect all cables and leads to the back panel port connectors.
Note
You must always refit all protective metal plates. These plates, in
addition to providing protection for delicate components, contribute to an effective flow
of cool air through the machine.
Motherboard Power Distribution Panel
The motherboard power distribution panel is fixed to the inner roof of
the electronics chamber and is positioned at right angles to the motherboard. The
following illustration shows the connectors and the eight securing screws on the board:
 |
| A |
Securing Screws (x8) |
|
|
| 1 |
Loudspeaker Connector |
6 |
SMIC Card Connector |
| 2 |
Motherboard connector |
7 |
Power from motherboard |
| 3 |
Fan Board Connector |
8 |
Power from motherboard |
| 4 |
Aux. power connector |
9 |
Power to/from m’board |
| 5 |
SMC connection |
10 |
3.3 v supply to m’board |
|
Removing
Unplug all connectors on the panel, noting their position.
Note
You may have to remove the termination/additional CPU
card to provide enough working space to complete this procedure.
Remove eight securing screws and remove the panel.
Fitting
Fasten the panel to the inner roof of the electronics
chamber with the 8 screws.
Plug the various connectors into the board. Each connector
is keyed so that it cannot be plugged into the wrong socket.


|
