Using an Epson GT-5000 (Parallel) with Trent
based machines (BIOS ver 7.07 or greater).
This IPB supersedes IPB 4200 dated 11th
February 1997.
Introduction
The Epson GT-5000 Flatbed Colour Scanner with Parallel Interface comes
with its own ISA Parallel Port card. It is preferable to connect the scanner to this
device so that you can connect a Printer to the on-board ECP Printer Port. Detailed below
is a step-by-step procedure for installing the scanner.
- Select BIOS configuration by pressing "F1" when the PC is
booting. Select the "DEVICES AND I/O PORTS" option.
- Check the following settings are correct:
"PARALLEL PORT" should be set to [AUTO-CONFIGURE],
"PARALLEL PORT MODE" should be set to [AUTO],
"PARALLEL PORT IRQ" should be set to [AUTO],
"PARALLEL PORT DMA" should be set to [AUTO].
- Save any changes and exit BIOS configuration. Windows 95 will now load.
- Click on "START", then "SETTINGS", then CONTROL
PANEL", double-click on "SYSTEM", then click on the "DEVICE
MANAGER" tab.
- From the list, double-click on "PORTS (COM & LPT)", then
double-click on "ECP PRINTER (LPT1)", then click on the "RESOURCES"
tab.
- If there is a tick in the "Use Automatic Configuration" box
then click on it to remove it. Next, change the "Settings Based On" to
"BASIC CONFIGURATION 0005".
- If Basic Configuration 0005 is unavailable, then change it to 0004, save
the settings by clicking on the OK button and reboot the PC. When the system restarts then
return to step 6 and repeat the procedure. You will find that Basic Configuration 0005
should now be available. Check that when Basic Configuration 0005 is set, that the value
for the Input/Output Range is 03BC-03BF and that the Interrupt Request is 07. Shut-down
& switch off the computer.
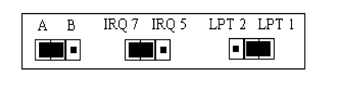
- Remove the top cover and fit the Epson parallel card into a spare slot
with the following jumper settings:-
- Connect the scanner to the Epson Parallel card with the cable provided.
- Switch the machine on and load Windows’95.
- Click on "START", then "SETTINGS", then "CONTROL
PANEL".
- Double-click on "ADD NEW HARDWARE". When prompted to search for
new hardware click on "NO" then "NEXT", then "PORTS (COM &
LPT)", then "PRINTER PORT".
- Windows will now install a new Printer Port with the settings 0278-027A.
Click on "NEXT", then "FINISH" to accept this setting, then click on
"YES" to restart the Computer.
- Click on "START", then "SETTINGS", then CONTROL
PANEL". Double-click on "SYSTEM", then click on the "DEVICE
MANAGER" tab.
- From the Device Manager list, double-click on "PORTS (COM &
LPT)".
- Double-click on "PRINTER PORT", then click on the
"RESOURCES" tab.
- If there is a tick in the Use Automatic Configuration box then click on
it to remove it.
- Double-click on the I/O setting & change it to "0378h".
- Restart the machine.
Install the Scanner software (2 disks - Epson Scan! II).
During installation, the "Epson Scanner Setup" screen will appear. At this point
select "BID Parallel" as the interface and "Port 378" as the Port ID
(see diagram below).

- The Scanner should now work fine.
----------oOo---------- |
